Creating Content Quickly and Easily with the eZ Publish Website Interface
This article is the second in a series focusing on concepts and features discussed in the newly released book eZ Publish Content Management Basics and is a short user guide to the eZ Publish Website Interface. The Website Interface is an optional extension to eZ Publish. The article describes how to work with the interface to edit and publish content. We focus on the Website Toolbar and the Content Editing Interface.
The eZ Publish Website Interface reduces content management complexity and increases ease-of-use compared to the Administration Interface. It integrates into the front-end of an eZ Publish website and requires user login to access.
Accessing the Website Interface
The Website Interface can, by default, only be accessed by users who are registered on the site and belong to the Editor or Administrator group. You therefore need a valid user account (username and password). After logging with an Editor account, you can add and edit content. With an Administrator account, you can additionally perform more advanced content management tasks and access site settings.
The Website Interface of eZ Publish can be accessed regardless of your physical location and / or operating environment as long the client machine is able to access the eZ Publish server via the internet or internal network, and is equipped with a supported web browser (Internet Explorer, Firefox).
The Online Editor and other interactive features make use of JavaScript technology. This means that JavaScript must be enabled in your web browser to be able to use these features.
JavaScript is a lightweight programming language that extends the functionality of XHTML. It is used in eZ Publish to create a more user-friendly environment. The interfaces will function correctly in non-JavaScript browsers, but will not be as feature-rich as intended. If JavaScript is disabled, the Online Editor will not be available and you will thus have to edit content as XML.
Most of the basic content management tasks can be performed through the Website Interface. It has a simpler graphical user interface (GUI) than the Administration Interface. One reason for this is that the Website Interface is embedded in the front-end of the site. As a result, you can navigate the site through familiar menus and links to locate content.
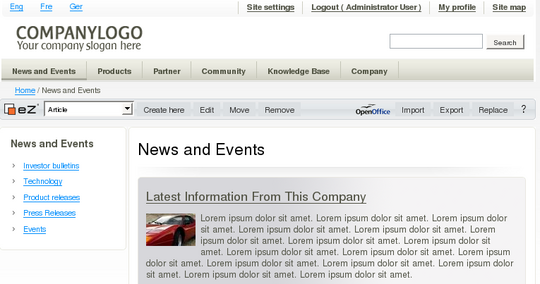
The illustration below shows the Website Interface
Website Interface with Website Toolbar
The visual difference from the public siteaccess is the presence of the Website Toolbar and the links in the top right corner. The toolbar is used to access and initiate content management and editing tasks.
The user profile (accessed via the My profile link) is associated with each individual user account, and is only accessible when the user is logged in. On this page you can change your password, update personal information, manage drafts and notifications, and view Webshop order information (if your site has a Webshop). Site settings (through the corresponding link) are only available to administrators.
Website Toolbar
In the Website Interface, the Website Toolbar will be your most important tool for editing and managing content. An important feature of the Website Toolbar is context sensitivity. This means that the buttons and options shown on the toolbar depend on the content currently displayed and the operations available under the given circumstances.
For example, you may upload an image to an article, but attempting to put an article inside an image makes no sense (and is an illegal operation). Thus, you will not find a "create new article" option when viewing an image.
As seen in the above screenshot, the Website Toolbar provides access to operations such as creating new content (at the current location), as well as editing, moving or removing content. You can also use the OpenOffice.org import / export feature.
In other contexts, you may find buttons for translating content, comparing versions and previewing work in progress. Clicking the question mark on the right side of the toolbar will bring up the online documentation at http://ez.no/doc .
Basic concepts
Recall from the first article in this series that a content type is called a content class (or "class" for short), while a specific piece of content is called a content object (or "object" for short). A content class can be thought of as a structural blueprint for a particular type of content. The properties of a class are referred to as attributes.
The content hierarchy is a tree representation of your published content objects. It follows the same principle with respect to folders and files as normal operating systems do: you can put a file (or another folder) into a folder, but not the other way around. In eZ Publish, folder-like content classes (and objects of those classes) are referred to as containers. The Folder class is the most frequently-used container. Other containers include the Documentation page, Gallery and Frontpage classes.
Content Editing Interface - edit mode
The two most important tools for a front-end eZ editor are the Website Toolbar and the Online Editor. You are working in edit mode when you are viewing some content in the Content Editing Interface. This usually means that either the Edit or Create here button has been clicked on the Website Toolbar. Other operations such as site navigation and searching are disabled during edit mode.
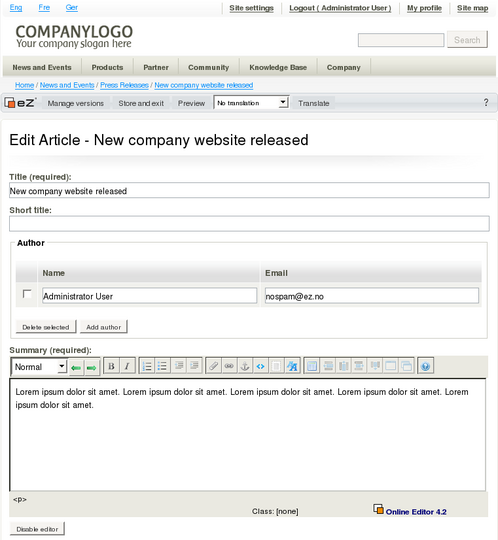
The screenshot below shows a typical view of edit mode. Notice the different input fields for the attributes of the content being edited. This is where you enter and modify information. Some attributes are required, meaning that you must provide content there in order to store (and publish) the object. These input fields are marked, and you will also get a warning about missing information if you attempt to store the object without valid input.
At the bottom of the screenshot is an input field for the Summary attribute. In contrast to the simple input field of the Title attribute, this field supports formatted text, which can be applied using the Online Editor.
Website interface - edit mode (Content Editing Interface)
Online Editor
Both the Content Editing Interface, and its equivalent Object Edit Interface from the Administration Interface use a specialized application resource called the Online Editor (OE). The WYSIWYG Online Editor facilitates the manipulation of content attributes. When editing content, you can use the Online Editor to apply formatting characteristics to text. You can perform actions such as creating links and inserting tables and lists.
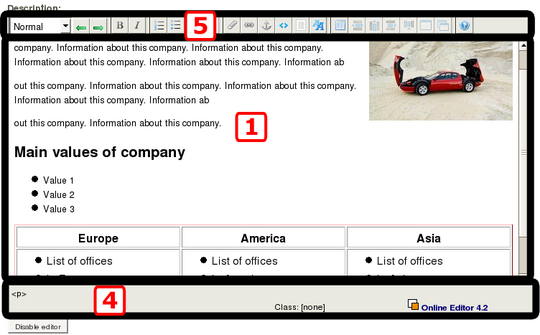
The Online Editor has five elements, three of which are shown in the screenshot below:
Components of the Online Editor
- The OE text area contains an editable visualization of XML code as formatted text.
- The context-sensitive pop-up menu can be accessed by right-clicking anywhere in the OE text area. In addition to standard commands like undo, cut, copy and so on, the pop-up menu contains specific items that can be used to manipulate the selected / current element.
- Modal dialogs provide access to additional editing tools, depending on the current setting.
- The OE status bar, located directly below the OE text area, displays useful information about the element where the cursor is currently located.
- The OE toolbar contains tools for editing the content that is displayed in the OE text area. The buttons are very similar to those found in many word processors. The following screenshot shows the different buttons:
Publishing content involves creating objects of different content classes. To display the available content classes, click the dropdown list on the Website Toolbar.
We will now walk you through how to create a new article containing inline graphics (and some other features).
Browse to the page under which you want to add the new content. For example, if you want to add a new article, browse to the folder container under which you want the article to appear. Select the desired content class (the Article class in this case) from the dropdown list on the Website Toolbar. Then, click the Create button.
When you create a content object, you trigger edit mode where fields are displayed where you enter data for the object's attributes (such as the title and body of the object). Fill in the fields with the appropriate values.
To include inline graphics, follow the instructions of the section below. To insert hyperlinks, headings, emphasized text, lists, tables and so on, use the corresponding buttons on the OE toolbar or select from the context-sensitive pop-up menu. In most cases, this triggers a modal dialog where you specify the desired properties.
When finished editing, click the Send for publishing button to add the newly created content to the system and make it visible on the site. (Storing your changes without publishing is done through the draft mechanism, explained in the next section.) The new content object will be added to the content hierarchy, below the page / object you were just viewing.
Adding an inline image to the article
Images are the most common elements to embed in content. Through the embedding feature, you can insert images into the rich text XML block attributes (such as article bodies). Some content objects can be displayed within other content. For example, an image can be shown within an article. Other examples of embedded content include files, Flash videos and other media objects.
Note that an image cannot be inserted on the same line as a heading. It is recommended that you create a new paragraph before inserting an image. Then, position the cursor at a location where you wish to add an image, and click the Object button on the OE toolbar. You can also right-click and choose the "Insert object" item from the context-sensitive pop-up menu.
You will then see a modal dialog showing a list of related objects (objects that are either used by or that use the current object in some way). If there are no relations, the list will be empty. If the desired object is not in the list of related objects, you should add it by using one of the two buttons located below the list itself. It is possible to either add an existing object or upload a new file and use that as a related object. Otherwise, select the desired object from the list and specify its embedding properties. Set the desired properties and click the OK button. The inserted object will appear in the OE text area. Image objects will appear as images, while all other objects will appear as special icons.
Modifying existing content
Editing content is similar to adding content, in that the same attributes are displayed in edit mode, but they contain data from an existing object.
To edit content, first browse to the page that you want to change. In other words, make sure you are viewing the page that has the content you wish to modify. Click the Edit button to bring up the Content Editing Interface. In edit mode, the toolbar shown below is displayed. This provides access to various editing functions.
Website Toolbar in edit mode
When finished editing, choose either to publish your content (click the Send for publishing button) or to store the updated version as a draft without publishing it (click the Store draft or Store and exit button).
Version control mechanism
Recall from the first article in this series that the versioning feature makes it possible to have several versions of a content object. Generally, each time you click either the Create or Edit button on the Website Toolbar, a new version of the current content object is created and assigned a version number. Any previous versions of the object remain on the system. The system does not simply overwrite (or replace) the attributes of the object with the new data.
This is how eZ Publish keeps track of changes made by various users. An accidental or unwanted change can thus be undone by simply reverting an object back to a previous version.
The version with the Published status is the one that is displayed to site visitors. The Draft status is described below. Archived versions represent old content that you can revert to when needed.
You can see a list of existing versions for a content object, including drafts, by clicking the Manage versions button on the Website Toolbar when in edit mode. In other words, you first have to locate the content, then click the Edit button, and subsequently click the Manage versions button. Remember to discard the draft afterwards if you do not want to store the changes.
Editing conflicts
Editing conflicts can be a challenge on sites with a lot of content and / or multiple editors potentially working on the same content. Under some circumstances, there might be an editing conflict that needs to be resolved before you can continue to the edit page. Editing conflicts happen when several editors are editing the same content, making eZ Publish uncertain of which version of the content you want to edit. Do you want to edit the published version, or one of the drafts? Select the desired version of the content and click the Edit button.
Saving drafts
A draft contains content that has been saved but not yet published. At the bottom of the Content Editing Interface, next to the Send for publishing and Discard buttons is a third button labelled Store draft. Clicking this button will store the content as a draft and refresh the page in edit mode. You can also click the Store and exit button located on the Website Toolbar, to perform the save and exit operation. This will exit edit mode.
Resuming edits
You can resume working on a draft at a later time. However, only the user who created the draft can resume working on it, unlike the situation with published versions, where any content editor can edit them.
To view a list of your saved drafts and retrieve one for editing, you need to access your user profile (by clicking on the My profile link in the top right of a page). Within your profile page, click on the My drafts link. This will display a list of drafts belonging to you. Click on the corresponding Edit button to resume editing. You can also click on the name of a draft to bring up a preview, then click the Edit button on the Website Toolbar. This will bring up the Content Editing Interface. There, you can make any necessary edits, then publish or store the draft.
Discarding drafts
When in edit mode, you can discard a draft by clicking the Discard button. You can also delete drafts through your user profile. Select one or more drafts by marking the corresponding checkbox, then click the Remove button below the draft list. To remove all drafts, simply click the Empty Draft button. The My drafts page will then show the text "You have no drafts".
The Website Interface integrates into the front-end of an eZ Publish website, and provides reduced content management complexity and increased ease-of-use compared to the Administration Interface.
The presence of the Website Toolbar and the links in the top right corner differentiate it from the public siteaccess.
The Website Toolbar is context sensitive, meaning that the buttons and options shown depend on the content currently displayed and the operations available under the given circumstances.
You are working in edit mode when you are viewing some content in the Content Editing Interface. This usually means that either the Edit or Create here button has been clicked on the Website Toolbar. When editing content, you can use the Online Editor to apply formatting characteristics to text.
The versioning feature makes it possible to have several versions of a content object. A draft contains content that has been saved but not yet published. You can store a draft from edit mode with or without exiting the Content Editing Interface. To view a list of your saved drafts and retrieve one for editing, you need to access the My drafts section of your user profile.
Resources
- eZ Publish Content Management Basics book
- eZ documentation site
- An Introduction to eZ Publish Concepts - first article from this series


