Node Visibility: Hiding and Revealing Content
The target audience for this article includes anybody who works with content in the Administration Interface. We assume that you are familiar with the concepts of the content node tree, the object life cycle, and the general layout of the Administration Interface, which were all covered in the eZ Publish Content Management Basics book.
This article was written to be compatible with eZ Publish 4.0, although the concepts and procedures should be similar for other versions.
We have previously seen in this article that it is possible to create restricted areas by applying access permissions to sections. The hide / show feature also denies access, but is applied directly to nodes, without requiring section or permission management. Usually, it is used to prevent the display of content for all users on a siteaccess, and is therefore most suitable for temporary unavailability of content (for example, if you are working on a new area of a site).
Node visibility (or "visibility" for short) refers to whether some published content can be viewed, generally on the front-end of a site. The effect of hiding a node is that the node in question, and all of its descendants, disappears from the front-end pages while still being accessible from the Administration Interface. This behavior is regulated by an INI setting, as described later.
A visible node is only shown if it is allowed by the permission system. In other words, when the system determines whether or not to show a node, access control comes first, then node visibility.
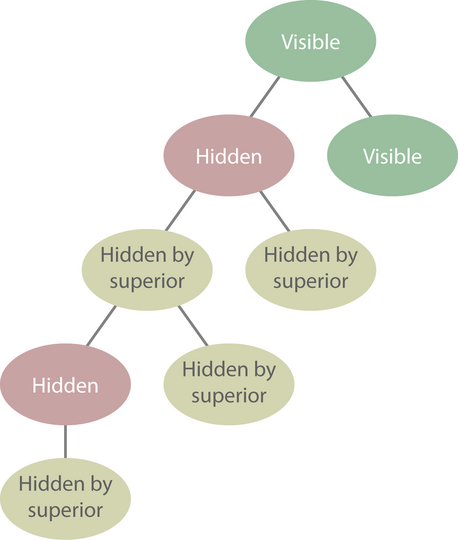
The following illustration shows a part of a node tree with two main branches. The direct descendant of the left branch has been hidden (by a user), while the node of the right branch is visible.
Content node tree with a hidden subtree
Suppose that you hide a folder containing all your products. Both the folder itself and the products will not be shown on the front-end of the site. Then you can, for example, update price information for the whole shop before revealing it to site visitors once again.
Keep in mind that visibility is applied to nodes, not objects. If you hide one location of an object, its other locations might still be visible.
Visibility statuses
"Visibility status" refers to whether a node (and content located below it) should be displayed and if not, whether it has been explicitly or implicitly hidden. A node has one of the following three visibility statuses: "visible", "hidden", or "hidden by superior".
Nodes with the "hidden" or "hidden by superior" status are not displayed on the front-end of a site, although there are different reasons as to why they are not displayed (as explained in the table below). Because the end result is the same in both cases, the terms "hidden", "invisible", "not shown" and "not displayed" are all commonly used to describe nodes with the "hidden" and "hidden by superior" statuses.
The table below summarizes the visibility statuses:
| Visibility status | Description |
|---|---|
| Visible | This is the default status. When the node is accessed, the object encapsulated by this node is displayed. |
| Hidden | The node is invisible and the referenced object is not displayed. This node was explicitly hidden by a content manager or another user with sufficient permissions. All nodes below it in the subtree are also invisible (with either a "hidden" or "hidden by superior" status). |
| Hidden by superior | The node is invisible and the referenced object is not displayed. A node with this status has a node with the "hidden" status somewhere above it in the content node tree (this can be a direct parent node or one of its ancestors). In other words, it has been indirectly hidden by the system because of a hide operation further up in the tree. |
Status propagation
When you alter the visibility of a node, this has an effect down the entire subtree. For content managers, this means that you can quickly hide or reveal entire subtrees, although you must be conscious of whether nodes have "hidden" or "hidden by superior" statuses.
For example, when you hide a node, all of the node's visible children are automatically given the "hidden by superior" status.
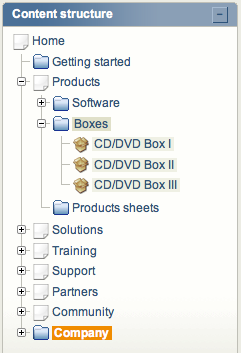
You can view the visibility of a node in several ways in the Administration Interface. First, and without having to actually access the node, you can check its visibility by looking at the background of the node name in the left tree menu. The background is normally transparent, but turns gray when a node is invisible. However, do not confuse this with the currently selected node, which has white text and a bolder background. In the screenshot below, the "Boxes" folder and its sub-items are hidden.
Left tree menu with a hidden node
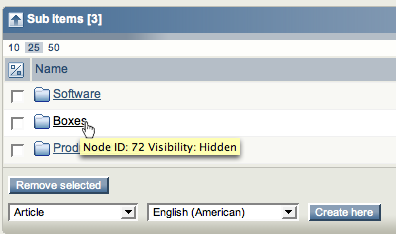
You can view the visibility status of a node from its hover tooltip in the left menu or Sub items window. For example, hover the cursor over the name of a node in the Sub items window to show a tooltip with the node's ID and visibility status:
Hover tooltip for a hidden node
Alternatively, view the node in the main area and look at the title bar of the Preview window. Next to the content class name, you will see "Hidden" or "Hidden by superior" in parentheses, representing those statuses. If the node is visible, there will be nothing to the right of the class name.
Lastly, you can examine the Visibility column of the Locations window when viewing a node. Here, you can change the visibility status as well (as explained later).
Locations window for a hidden node
Requirements for working with hidden content
If a user has the appropriate permissions in a given situation to access visible nodes, he or she can also view hidden nodes if the current siteaccess is configured to show hidden nodes.
The site.ini configuration file contains a "ShowHiddenNodes" setting in the "[SiteAccessSettings]" block. Typically, this is set to "false" for all of the site.ini siteaccess overrides except for the Administration Interface siteaccess (where it is set to "true"). See the online eZ Publish documentation for more information on INI files.
In order to be able to toggle the visibility status of a node, the user's account or user group must have been assigned a role with a policy granting access to the "hide" function (or all functions) of the "content" module. Otherwise, you must modify or assign the appropriate policy, as described in this article.
A user can hide and reveal a node using the Administration Interface, given that the above described requirements are met. As you will see, your most important tools in this case are the Locations window and the context-sensitive pop-up menu.
Note that the terms "reveal", "show" and "unhide" all refer to the same operation on a node.
The effect of hiding or revealing a node differs depending on whether its parent is visible or invisible. Recall that you can hover over a node in the left menu to show its visibility status. Also, the hide / reveal action will propagate down the subtree starting at the target node, and affecting its descendants, as we will demonstrate.
Altering the visibility status
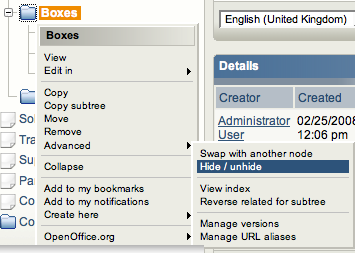
To explicitly hide or reveal a node, locate it in the left tree menu, bring up the pop-up menu, and select the "Hide / unhide" item under the "Advanced" sub-menu. The system will change the visibility status of the target node. (If the node has the "hidden by superior" status, this will give it the "hidden" status.)
Hiding a node through the pop-up menu
If you cannot use the above approach (if your browser does not have JavaScript enabled or your left menu only displays a subset of content classes that excludes your target node), follow the procedure below:
- Navigate to your target node and make sure it is displayed in the main area of the Administration Interface. Enable the Locations switch if the corresponding window is not shown.
- Within the Locations window, click the link in square brackets ("Hide" or "Reveal"). The current visibility status is shown in the Visibility column.
Hiding before publishing
You can also mark content as hidden before clicking the Send for publishing button in edit mode. You can only do this for the first version of an object. If you are about to edit a visible object that you want to make hidden, simply hide it before entering edit mode.
Hiding a node before publishing it is typically used for preventing the display of unfinished work; otherwise, the node is visible for at least a few seconds (before you can hide it) after it is published. It can also be used as a manual delayed publishing mechanism. Here, we use the term "manual" because you have to explicitly unhide the node later – you can also use the system's delayed publishing feature (described and explained in the eZ Publish Advanced Content Management book), which prevents the content from becoming published until a specified time.
In order for the "hide before publishing" feature to be available, the Locations window must be enabled for edit mode. You can toggle this in the Edit mode settings window on the left side of the My account tab.
Through the Locations window in edit mode, you can control where the object being edited should be published and how:
Locations window in edit mode
Once you have published an object (visible or invisible), it is part of the content node tree and thus you will be able to add sub-items to it. For example, you can publish an unfinished article as hidden, then create sub-pages for the article, and finally reveal the hidden article (and its sub-pages) when ready. This is handy since you cannot add sub-items to Draft objects (which do not yet have a location). The edit mode Locations window is disabled for all subsequent versions of the object.
The following node tree examples are chosen to highlight different scenarios, and do not build on each other in sequence.
Hiding nodes
By default, all nodes are visible. When you hide a node for the first time, the target node (and the nodes below it, if any) become invisible. The following scenarios explain the effect of hiding a node with a visible or an invisible (having a "hidden" or "hidden by superior" status) parent.
The effect of hiding a node with a visible parent
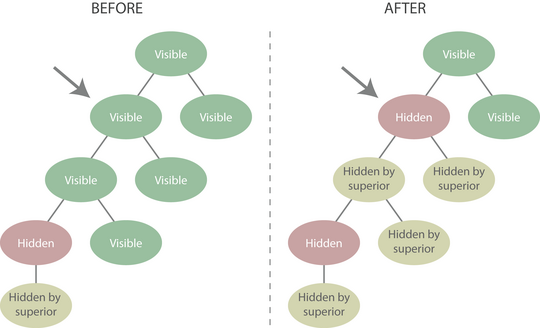
The following illustration shows a node tree before and after hiding a visible node.
Hiding a node with a visible parent
In the left side, only one node has a "hidden" status, and its direct descendant has a "hidden by superior" status as a result. When the indicated node is hidden, it receives the "hidden" status and its descendants receive the "hidden by superior" status. However, nodes in this subtree that already have the "hidden" or "hidden by superior" status before the operation preserve their visibility status. In other words, only nodes in the subtree that have a "visible" status are affected.
The effect of hiding a node with an invisible parent
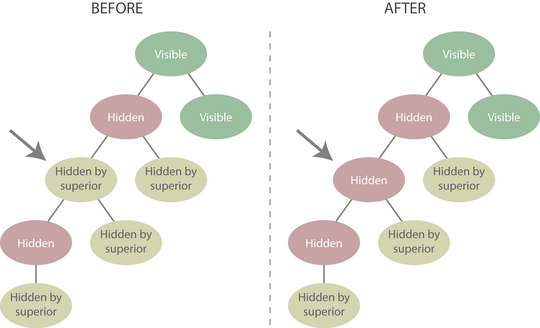
This second scenario is slightly different from the one above, in that the target node is already invisible (and has a "hidden by superior" status):
Hiding a node with an invisible parent
This operation is useful in cases where you want to hide a sub-branch before revealing a previously hidden larger part of the tree, since the sub-branch would remain hidden.
If a user tries to hide a node that is already invisible (and has the "hidden by superior" status), only the visibility status of that specific node will change. This is so because its subtree has already been affected by a previous hide operation higher in the tree. In the screenshot, the targeted node status changes from "hidden by superior" to "hidden", while all other nodes remain unchanged.
Revealing nodes
A hidden node (or subtree of nodes) can be revealed using the same techniques as described earlier: either access the context-sensitive pop-up menu or the Locations window. Note that you cannot directly reveal a node with a "hidden by superior" status, since it has inherited its invisibility from a hidden node higher in the node tree.
Revealing a node with a "hidden" status will make it visible if it has a visible parent. If it has an invisible parent (with a "hidden" or "hidden by superior" status), it will receive the "hidden by superior" status. The effect will also propagate to descendants of the target node.
The effect of revealing a node with a visible parent
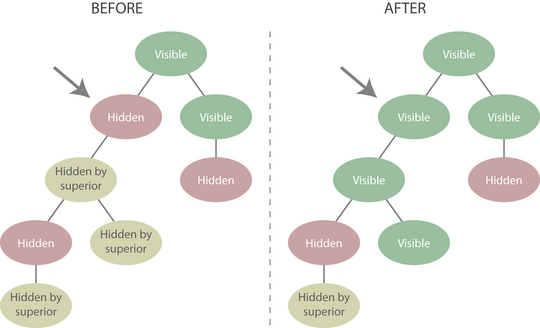
The following illustration shows the case when a target node with a "hidden" status is revealed below a visible node:
Revealing a node with a visible parent
Observe the change from being hidden to visible for the target node. Its descendants also become visible. However, notice in particular that the propagated effect stops when a node with the "hidden" status is encountered. If a node has a "hidden" status and one of its ancestors becomes visible, the node will remain hidden and its descendants will remain invisible.
The effect of revealing a node with an invisible parent
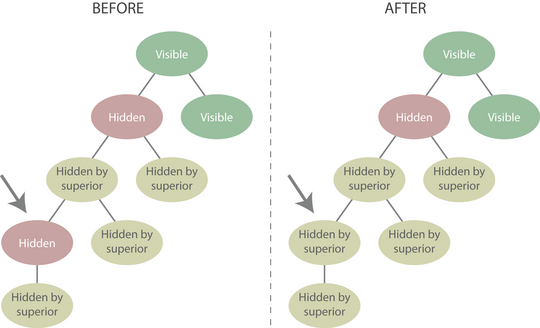
A node with an invisible parent means that higher up in the tree, a node (perhaps even its direct parent) has a "hidden" status:
Revealing a node with an invisible parent
Although the target node remains invisible after the reveal operation, its status changes from "hidden" to "hidden by superior". This is because there is still a superior node that has a "hidden" status. In the right side of the illustration above, one would need to also explicitly unhide the node with the "hidden" status in order to make all nodes in the example tree visible.
While it might not be apparent at first, this can be quite useful. For example, if you have an invisible subtree for some new product documentation in progress, that subtree might have several different sub-branches dedicated to different parts of the documentation. By first explicitly hiding these sub-branches, they can subsequently be revealed to internally signify that they have been completed. When the parent node for the product documentation is finally revealed on the product launch date, all of its descendants will become visible (since they all have the "hidden by superior" status). If any parts of the documentation are not yet ready during the launch date (in other words, one or more of the nodes has a "hidden" status), they will remain invisible.
Node visibility refers to whether or not some published content can be viewed on the front-end of a site. Hiding a node will render the target node and the entire subtree below it invisible. This is the correct way to "unpublish" content without deleting it or moving it to a restricted section.
The three visibility statuses are "visible", "hidden" and "hidden by superior". You can alter the visibility status of a node from the pop-up menu or the Locations window.
